Monday, December 30, 2019

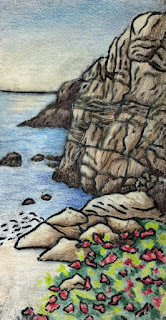
In The Reeds

"In The Reeds"
Image size 5" x 6.5"
Monotype using Akua ink and colored pencil

The reference photo for this was taken on a trip to South Carolina years ago.  We visited a beautiful plantation and it was a fresh, sunny day with clouds drifting by.  I have painted this scene before using oil paints.
I like the effect of the black ink as the main color with color added.  It reminds me of a colorized black and white photo.

Monday, December 23, 2019

View From Heisler

"View From Heisler"
Image size 6" x 12"
Acrylic
I painted the canvas black before I started this painting.  It is a palette knife painting.  For me, it's harder to do a palette knife painting with acrylics than it is with oils.  Even though I was using heavy body acrylics, they are still less stiff than most of my oils.  I do really enjoy using the palette knife regardless of the medium though.

I hope you all enjoy the holidays and enthusiastically embrace the new year!!!

Monday, December 16, 2019

Crazy Sunset

"Crazy Sunset"
Image size 11" x 15"
Acrylic

I had a watercolor that I painted many years ago on a 22" x 30" piece of paper.  It was a painting of Lake Powell.  I was never happy with it and tried many times to save it.  Finally, I decided to cut it into fourths and use each piece for a new painting.  For this painting, I added rice paper and gesso, which I swirled around so that there were thin and thick areas.  The thick areas are white and the thin areas let the underpainting show through.

I turned the painting upside down so that the sky of the old painting became the water and the red cliffs became the sky.  I thought that might be a fun beginning.  The texture is a bit wild, but it was fun to paint.

I'm taking a break from my clay project until after Christmas.  There's just too much to do.

Monday, December 9, 2019

Desert Sky

"Desert Sky"
Image size 14" x 14"
Watercolor
This painting was done wet into wet.  That seems to be the best way to get the effect of clouds for me.
This is a very loose painting for me and it was really fun to paint.


Monday, December 2, 2019

Puerto Vallarta Cliffs

"Puerto Vallarta Cliffs"
Image size 14" x 6"
Monoprint with colored pencil
I spent so much time cutting all of those black lines into a piece of matboard and this was the look I was trying to achieve.  I don't have a printing press so I printed this using a baren and the back of a spoon.  I thought it would transfer easily, but to get the black lines to transfer, I had to push the paper into the lines with my fingernail.  I think I cut the lines too deep.  

I am happy with the result, but I think I like the first print I pulled better, which is shown below.  When the ink wasn't going into the grooves as I applied the ink with the brayer, I decided to try this one with white lines instead of black.  I wiped the surface in areas to give a sense of light, but overall, the surface was much darker in this print.  I added colored pencil on this print as well.
Which one do you like better?

I didn't work on the clay mural this week.  I was sick the entire week.  I'm getting tired of this.  Finally, I think I'm getting better, so hopefully, I will begin moving forward again on that project.

Monday, November 25, 2019

Calm Afternoon

"Calm Afternoon"
Image size 4" x 11"
Watercolor

This week was not very productive which is why my painting is so small and simple.  I babysat for 3 days and then was sick for the rest of the week.

I did nothing on my mural....

Monday, November 18, 2019

Private Shore

"Private Shore"
Image size 5" x 8"
Monoprint with colored pencil

I tried another monoprint this week.  I inked the entire surface and then removed the black ink where I wanted it lighter.  Drawing directly into the ink without the ability to erase my mistakes is very scary.  I'm struggling with that and the removal of the ink and haven't really figured out a way to control what I'm doing.  That's why this house looks a bit wonky.  It is a fun process though, and I will continue to experiment with this medium.

I used Derwent Inktense colored pencils to add color to the print.  On this print (above), I didn't add water to the pencils.  Living up to their name, when water is added, the colors become very intense.  I did a second print, which I've posted below.  I lightly spritzed the printing plate with water and used a damp piece of mulberry paper to make the second print.  Then, I used the inktense colored pencils and added water to the paper.  You can see how different the colors are.  Personally, I prefer the softer colors in the first print.

Not much to say about my clay mural except that I'm continuing to work on it.  I'm starting to choose the glass circle that fits best into the holes and grinding the clay to make some of them fit when the circle is too small.


Monday, November 11, 2019

Pear Monoprint

"Pear Monoprint"
Image size 6" x 8"
Monoprint with colored pencil added
I'm playing around with a new medium.  I have done a couple of monoprints in the past but didn't really get into that medium.  Now, I'm very interested in playing around with the inks and adding color using other mediums.  This is my first experiment.  I used mulberry paper, which was wonderful to print on, but it seemed to pill while I was adding the colored pencil.  I think I used the wrong side....
Anyway, this was really fun and I can't wait to try it again.

My clay mural is still chugging along slowly.  Nothing exciting to show at this point.

Monday, November 4, 2019

Italian Cypress

Italian Cypress
Image size 7.5" x 7.5"
Pastels
I used my pastels for this week's painting.  I enjoyed the theme of last week's painting, so I used the same idea but concentrated on the sky as a focal point.  Of course, the cypress trees draw you into the painting, but hopefully, the sky keeps you interested.

I used a dark blue mat board with a coating of pumice gel as my substrate.  None of that color shows through because I have many layers of pastel covering it.  I really enjoy the tooth of the pumice gel as it allows for multiple layers before the surface is slick and won't accept more color.

Well, I'm finally finished cutting the clay pieces for the murals.  That feels really good!!  Of course, I'm still a long way from being able to fire everything and start glazing.  I have about 120 pieces that I need to carve and fit into the mural.  That takes a long time so that will be my focus for this week.

Monday, October 28, 2019

Italian Vista

"Italian Vista"
Image size 14" x 8.5"
Acrylic on rice paper

I had a piece of paper that was covered with an interesting rice paper that I found in my studio.  I had added some initial colors a long time ago.  I decided to see what could be done with it and this is what I painted.  I really like the texture of this rice paper.  It looks like it has short sticks in it, which adds a lot of interest to a painting.

I used acrylics I thinned to a consistency a bit thicker than watercolor and began adding layers of color.  The underlying colors still show through, which give it a bit of a dull look.  Usually, I wouldn't like that since I really love bright colors, but it seems to fit this scene.

Finally, on my tile mural, I can see the light at the end of the tunnel.  I have only 16 pieces left to cut on the large side and have bisque fired almost 200 pieces.  In the pictures below, the white pieces have had their first (bisque) firing and are ready to glaze (paint).  I still need to carve a lot of the pieces to fit before I can continue firing, but it feels like the cutting will be finished soon.  I have to cut about 60 pieces on the small side, but I'm hoping to have all cutting and fitting for both sides finished by next week.


Monday, October 21, 2019

Pacific Coast

"Pacific Coast"
Image size 8" x 10"
Oil
I took a 1-day workshop on Saturday that was taught by Rick Delanty.  I've attended workshops with him before and have always learned a lot.  

I really fought with this painting and I'm not sure how I feel about it, but I'm finished working on it.  Time to move on to the next painting...

My clay mural is still slowly moving forward.  I had the elements replaced in my kiln, so it should take less time for each load to fire.  I will try it for the first time tomorrow.  The kiln is loaded and ready to turn on.  I was able to fit quite a few pieces in it.  I might be able to do all of the bisque firing in 4 or 5 batches.  The slow part will be when I'm firing all of the glazed pieces.  I'm still a long way from worrying about that though!

Monday, October 14, 2019

Web

"Web"
Image size 17" x 24"
Acrylic on TerraSkin
I'm having so much fun working with my acrylics.  This TerraSkin surface is great for achieving these textures by manipulating the thinned paints on a non-porous surface.  My friend just told me that this product is no longer available.  I still have some, but when I run out, I think Yupo will work the same way.  Both are non-porous and although I like the surface of TerraSkin better, for this painting technique, I think the results would be the same.

The white circles in this painting are from using resist before I started painting.  The white squiggles are a product made by Golden Paints called Tar Gel.  It is a very stringy fluid that gives a continuous stringy drip when dropping it from a palette knife or similar instrument.  It comes clear and works very well straight out of the jar.  Unfortunately, I've found that after some paint is added to it, it doesn't dribble as well.  I need to call the company and talk to them about it.  Maybe my paint to Tar Gel ratio is off.  Probably, when less paint is added, it retains its original consistency.  I only added the amount of paint I thought was needed to make it opaque.  Anyway, I like the effect.

Nothing to show on my clay mural.  I'm still cutting and fitting the pieces...SLOWLY!!

Monday, October 7, 2019

Santiago Canyon Poured Painting

"Santiago Canyon Poured Painting"
Image size 8" x 22"
Watercolor
I haven't painted a poured watercolor painting for a long time.  I have always liked the look of poured paintings.  They have a glow that isn't usually achieved with direct painting.  I did a little too much direct painting on this one to really get the full feeling of a poured painting.  It probably wasn't the best photo reference to pick, but I think it turned out okay.  

Poured paintings are very graphic since resist is used between each pour to save the lighter areas.  I happen to like that look a lot.  It does give a "pasted on" feeling, but that's part of the appeal.

I'm still cutting, cutting, cutting clay pieces.  I work on the mural every day, but it doesn't feel like I'm progressing as quickly as I think I should.  Since I am cutting the pieces larger and have to trim them to fit, it is very slow going.  The other day, I worked for 3 hours and only got 12 pieces carved to fit.  Sigh.....I'm really ready to paint this project.

I'm getting new elements put into my kiln.  It took 10.5 hours to fire a load of bisque and it used to take about half that time.  The tech said that is because the elements are so old and failing.  He checked my serial number and told me that it is 35 years old.  I guess I've gotten a lot of use out of it without it needing maintenance.  It will be nice to get the elements changed.  I will start firing loads as soon as that is fixed, even though everything isn't cut yet.  I've got at least 250-300 cut and ready to bisque fire.

Monday, September 30, 2019

Swirls

"Swirls"
Image size 16.5" x 6.5"
Watercolor, rice paper
I found a piece of paper that had an interesting feel to it so I tried painting some watercolor on it.  It was immediately evident that it was an unsized paper, but I thought I could still get a good result.  Some of my favorite paintings have been done on unsized paper.

As I was working on it, it began to pill.  That wasn't good!  I found this fanciful rice paper that I've always wanted to use and attached it over the fragile paper using matte medium.  The medium seals the paper and along with the rice paper, it is now a sturdy substrate.  After it dried, I added darker colors and different colors than the underpainting which gave it a nice depth.

I'm continuing to work on the tile mural.  The weather has cooled off so it's much nicer working in the garage now.  I've probably got a third of the large side to cut still.  I can move my extra tables to the other side of my large work tables now and hopefully, I will finish cutting the large side within a few weeks.

I've started re-drawing the smaller side, making the fish larger.  I am able to use about 35 of the original pieces I cut for that side.  I've placed then on the pattern and will draw around them, then create the rest of the pattern around them.  By using them, I will save a lot of time and clay.

So far, I've used 175 pounds of clay and am estimating that I will need about 75 pounds more to finish the project.  Of course, a lot of that ends up as scraps as I cut around each pattern.

Monday, September 23, 2019

Crevice

"Crevice"
Image Size 12.5" x 17.5"
Acrylic on TerraSkin
I'm painting on TerraSkin again.  I'm so glad that I rediscovered this surface.  Working with acrylic on this surface is perfect for me.  I thin the paints down and use them like watercolor, but unlike watercolor, the colors don't lift off of the surface when I add layers.

I'm diligently working on my clay mural.  It is taking forever, but now I'm getting to the skinnier part of the mural so it feels like I'm progressing more quickly.  I'm cutting everything on one side of the mural and then I will work on the other side.  With my two tables put together, the surface is 16 feet long.  I've set up a couple of skinny tables to use for rolling the clay and cutting the pieces since there is no room on my regular work tables.  Once I get everything cut on this side, I will move the skinny tables to the other side to finish my cutting rather than having to walk from one side of my table to the other.  It's a long way!  Also, the space between the tables is so narrow that in one area I have to step side to side to get through.  And another point, I'm too lazy to make all of that extra work for myself.
Here is a picture of my progress and you can see the skinny tables and my cramped working space.
From this picture, it doesn't look like I've done much, but those clay pieces that are cut are taking up the length of an 8' table.


Monday, September 16, 2019

Fissures

"Fissures"
Image size 17" x 24"
Acrylic on TerraSkin

I decided to play with TerraSkin again this week.  It is such a fun surface and painting multiple layers with the thinned acrylics gives a wonderful sense of depth.

I'm still plodding along with the clay mural that I've been working on for a couple of months.  It's really still too hot to work much in the garage, so not much is being accomplished at this point.  I did get the practice clay painting fired and it is really to glaze, but I am going to wait until I'm ready to glaze the large mural so that I can remember exactly what I did and what I need to change.

Monday, September 9, 2019

Scattered Thoughts

"Scattered Thoughts" diptych
Image size 9" x 10"
Acrylic on TerraSkin
I had so much fun creating the textures in this painting.  I haven't worked on TerraSkin for a long time and had forgotten what a wonderful surface it is.  I painted this as one painting and then cut it in the middle because there was a crease in the paper.  I think it is more interesting as a diptych, so a crease that could have been a mistake made a better painting (in my opinion).

I'm still working on the clay mural.  It is slow going.  I will probably start firing the pieces for the "practice" painting tomorrow.  I am cutting the clay for the larger side of the mural.  Here is how far I've gotten.  The extra pieces on the side are some that needed to be recut because they were too small.  I'm sure I will save them to make another project.


Monday, September 2, 2019

Palette Knife Clouds

"Palette Knife Clouds"
Image size 6" x 6"
Oil
Here's another palette knife painting.  I've decided that clouds are hard to do with a palette knife because they don't look very fluffy.  It was fun to try though.

I'm still working on my clay project.  I have finished cutting all of the pieces for the 18" x 36" painting that I'm doing as a practice project.  I was out of town for a few days this past week, so I didn't get any of the clay pieces cut for the real mural.  

Right now, the weather is in the 90's so working in my garage is pretty uncomfortable.  I can only stand to work for about an hour at a time before I'm sweating profusely... not a good feeling (or a good look).  It is supposed to be cooler by next weekend, so then it will be more comfortable to spend time working in the garage.

Monday, August 26, 2019

Palette Knife Wave

"Palette Knife Wave"
Image size 4" x 6"
Water Miscible Oils
This is another palette knife painting.  I love the texture and movement that can be achieved with the palette knife.

I spent a lot of time this week working on my clay mosaic mural.  I made a decision that will make it take a lot longer to finish it though.
I decided to re-cut the entire small side that shrunk so much, rather than trying to make it work by recutting some pieces and using some of the smaller pieces.  Also, I decided that the fish on this side were much smaller than on the larger side.  I guess I was paying more attention to how they fit into the smaller space when I designed it rather than having the correct scale to go with the larger side.  
I am using about half of the original pieces to make a mosaic painting that can hang on a wall.  I decided that it would be a good idea to be able to glaze a smaller version of what I'm doing to see how it turns out rather than glazing (painting) my huge mural and not being happy with the result.  Since it is hard to know how it will look once it is fired, I feel more comfortable having a trial painting.  So, maybe it's a good thing that the pieces shrunk so much.  I probably wouldn't have thought to do a trial painting otherwise.

I could have used more of the original pieces for this painting, but I decided that I didn't want the glass circles in this one.  I ended up cutting new pieces for about half of it.  I also moved one of the fish closer in so that he would be in this painting. When it is finished, it will be 18" x 36".  I'm a little worried about how heavy it will be, but I don't think it will be more than 50 pounds.  There are hooks for 100# paintings, so I should be okay.
Here is a picture of it showing the original pieces that will be used.  I have cut out the rest of the pieces and they are drying.  
So, this will probably add a couple of weeks to the finish date of the big mural for my yard.  It doesn't really matter.  Since it's for me, there is no 'finish by' date.  I'm usually just happy if I actually finish any project that is for me.


Monday, August 19, 2019

Cruising

"Cruising"
Image size 8" x 10"
Water Miscible oils

I wanted to paint Koi this week and thought that a palette knife painting would be fun and a bit looser than my usual.  I painted it on a stretched canvas that has been primed with Cadmium red paint so it has a very warm red underpainting.  I love having bits of bright colors showing through to give it some energy.

Most of my week was spent cutting out clay for my tile mural.  I finished cutting all of the pieces for the smaller side - about 125 pieces.  I know that clay shrinks when it dries (about 10%), but I underestimated how much that would affect the mural.  I want the grout lines to be about 1/8th inch and the pieces shrunk so much that if I placed them on the pattern where they belonged, the grout lines would have been about 1/4" or more.  In the picture below, I've pushed the pieces together and you can see the pattern around the curved edge and how much shrinkage there was.  The areas that are darker are where the clay isn't fully dry.  I will re-cut some pieces so that I can get it back to the original intended size.  It's all a learning experience.  Sigh...  Have I mentioned that I really don't know what I'm doing?  I've rarely worked with clay.


I've started cutting the pieces for the larger side and I am enlarging each piece by 1/8" all the way around each of the pattern pieces.  I'm sure I will have some tweaking to do once they dry and shrink, but that's okay.  I've heard that the pieces also shrink a little when they are fired, so this whole project is a big question mark.  Luckily, there is only one edge of each mural that needs to be accurate.  That is the side that abuts the sidewalk.  If the other outside dimensions of the mural are smaller, it really doesn't matter.  The only thing I need to worry about is having an accurate pattern to use to create the concrete pad on which the mural will be attached.

Another issue that I had with the clay is that my pieces wanted to curl up as they dried.  I googled that issue and one person said that it was because the top of the piece was drying more quickly than the rest of the clay.  The suggestion was to place the clay pieces on a rack so that air could circulate around the entire piece.  I know that the bottoms of the pieces weren't drying quickly because they were sitting on plastic.  I covered the pattern with plastic to protect it, but that also kept the bottom of the pieces from drying.  I'll see if the rack solves the problem.

Monday, August 12, 2019

Sky study in Pastel

"Sky study in pastel"
Image size 7" x 10"
Pastel
I was still playing around with clouds this week, but using pastels this time.  This was done from one of my photos and it looks like it was taken as a storm was clearing.  I love how dramatic the clouds look.

I've set up my mosaic patterns out in my garage on my work tables.  One of the tables is 4' x 8' and I thought the larger mosaic would fit on that table, but it is about 4' longer than the table so I will have to extend it with another table as I get more involved with the process.  I've covered the master pattern with plastic so that the clay doesn't ruin it and have taped all of the background pattern pieces in place.  I will have the garage doors open as I work and I don't want the pattern pieces blowing around.  I need to cut the pieces out in numerical order so that whatever texture I add can run through the adjoining pieces while the clay is wet.  Here is the big pattern and you can see that a portion (about 4 ft) is rolled up, waiting to find its place on another table in the future.

And here is the small side on another table.
I also made a couple of color charts.  One is just the colors I'm planning to use and the second is the blues overlapping the colors I will be using for the fish so I can get a feeling of which colors might work best.  Some are semi-translucent and some are opaque so the effects will differ.
When painting with glazes, it's very hard to tell what the finished result will be since the colors change (some dramatically) after they are fired.  Here are photos of the charts before and after firing.  In the first set, notice how some of the greens were a rust color before they were fired.
Before firing
After firing.  I put two coats on the right side of each color to see the difference and can choose to paint a veil of color or a thicker layer for a more opaque effect.


Layered colors - before firing

This is turned a different direction, but you get the idea.  You can see where I let the glazes be thick and thin so I would have a good idea of what effect could be achieved.

And, of course, I don't think my kiln is working properly.  I'm surprised that these charts came out okay.  My kiln is supposed to turn off automatically when the correct temperature is reached.  From memory, I think it used to take about 3.5 or 4 hours.  After 5 hours, I turned it off because the temperature didn't seem to be advancing.  I thought that I would see unfired glazes when I opened it this morning, so I was pleasantly surprised.  I don't know if the problem was user error or if there is a problem.  I have called a kiln technician and hopefully, I will hear from him soon. 


Monday, August 5, 2019

Calm Lake

"Calm Lake"
Image size 15" x 22"
Watercolor
I finished this watercolor that I started last month.  I wanted to do a cloud study and this is what I decided to paint.

I also worked on my ceramic mural.  I still haven't cut any clay yet, but I have finished cutting out all of the pattern pieces for the two murals.  I'm having work done in my garage this week and as soon as I get it put back together, I will lay the patterns out on my work tables and start the real work!  I'm excited to start.

Monday, July 29, 2019

Mosaic Mural - small side

Mosaic mural - small side
Image size 27" x 40"
I did the pattern for the smaller side of the mosaic mural this week.  I just noticed that I didn't add any circles for the glass beads, so I need to do that.

Here is a picture of how they will look in my yard.  I took this before I designed the smaller side.

I know this looks pretty rough, but you get the idea.  Once it is installed, I will do plantings that overhang the edges so that it will look more like a pond.

I also spent a lot of time cutting out pattern pieces from the larger side this week.  There are over 400 pieces on that side, not counting the circles.  I have cut about 300 of them.  

I'm keeping track of the time I spend on this project just for fun.  So far, I've spent more that 40 hours on it and I haven't even touched a piece of clay!

It's a slow process, but very meditative.

Monday, July 22, 2019

mosaic mural pattern

Mosaic mural pattern
Image size 4' x 8' approx.
This isn't a finished painting, but it is a finished pattern for a very large project I'm working on and I'm thrilled to be able to finally start on the fun part.

Each of these pieces will be formed from clay, then textured and glazed with colors to create a "Koi Pond" for my backyard.  The background (which isn't colored on this pattern) will be various blues and the circles will be glass beads.  I just colored the fish and lily pads so that I wouldn't get too confused as I'm working on it.  

My next step will be to number all of the pieces and cut patterns for each piece.  This is my master pattern and if this gets destroyed, I will be in a bad place.  

I purchased my glazes and 75 pounds of clay to start.  I am guessing that it will take about 100 pounds or more to finish it.  There is also a small area that will be on the other side of the sidewalk so it (hopefully) looks like the stream flows under the walkway.  I haven't designed that yet.  It is much smaller than this side.  It's probably about 3' x 3.5'.  That will be for another day.

Monday, July 15, 2019

Encaustic Eucalyptus


"Encaustic Eucalyptus"
Image size 18" x 24"
Encaustic
I painted this from a reference photo that I took on an early morning walk close to where I live.  The sun was just peeking over the hill and I love how the sun is hitting the trees in this picture.

Monday, July 8, 2019

Restful Lilypads

"Restful Lilypads"
Image size 12" x 16"
Encaustic
I'm still working with encaustic this week.  I've been working on this one for a while.  Now that I'm seeing it in a photo, I think I will add some reflections to the edges of the lilies.

Monday, July 1, 2019

On The Horizon

"On The Horizon"
Image size 7" x 5"
Encaustic
What is that on the horizon?  Who knows?  It's whatever your imagination thinks it is.  

Monday, June 24, 2019

Hanging Out

"Hanging Out"
image size 15" x 22"
Watercolor
Watercolor is the perfect medium to use for painting Koi.  They are a favorite subject of mine, and I plan to paint more of them in the near future.

Monday, June 17, 2019

Hazy Sunset


"Hazy Sunset"
Image size 9" x 12"
Encaustic
I was experimenting with a wax that is supposed to crack.  I thought that would give the painting a really nice effect.  I could fill the cracks with a different color to really make them a focal point of the painting.  

The first layer of the crack wax gave me two very small cracks.  The instructions said to put a good base layer of other wax before adding the crack wax.  I thought I did that, but maybe it wasn't enough.

So...I added oil paint to fill the small cracks and added more wax, an encaustic burn and finally, another layer of the crack wax.  This time, I got no cracks, but it did give and interesting texture to the surface.

I noticed that this wax melts at a higher temperature than the wax that I usually use, so maybe that had something to do with my results.

It was a fun experiment, but I will probably stick with my usual encaustic supplies.  Of course, I will use the rest of what I have so you will probably see another experiment in the future.  I will call the company and see if I am doing something wrong.

Monday, June 10, 2019

Cool Day

"Cool Day"
Image size 7.5" x 11"
Watercolor
We have been having some hot weather so painting this subject was my way of cooling off this week.

Monday, June 3, 2019

Lapping the Shore


"Lapping the Shore"
Image size 12" x 12"
Encaustic

As much as I love the look and sound of large waves, there is something very soothing about those beach days when there are just little ripples that come to the shoreline with just a hint of white foam.

Monday, May 27, 2019

Galaxy

"Galaxy"
Image size 8" x 9.5"
Acrylic
I recently purchased some window coverings for my home and this was a sample piece of fabric for some blinds.  I thought it had a very interesting texture so I used it as a painting surface.  I think it adds a lot of interest to this abstract painting.

Monday, May 20, 2019

Sunny Day

"Sunny Day"
Image size 15" x 36"
Acrylic
I'm painting with acrylic again this week.  I'm using it more like a watercolor with layers of thin glazes because that's how I'm used to working.  Also, it's really hard for me to paint using thick paints and I like the look of thin veils of color.

Related Posts with Thumbnails